The Importance of Men’s Eyebrow Grooming
Modern style expectations demand more than basic grooming․ Well-maintained eyebrows are crucial‚ enhancing your appearance and conveying a polished look․ Elevate your routine‚ embracing this vital‚ overlooked aspect of presentation․
Understanding Your Natural Eyebrow Shape

Before any trimming or tweezing begins‚ the fundamental first step for men’s eyebrow grooming is to truly understand your natural brow shape․ Your eyebrows are as individual as you are‚ and respecting their inherent design is crucial for a masculine‚ yet refined‚ appearance․ Avoid the common pitfall of over-grooming by first pinpointing where your brows naturally begin‚ arch‚ and end․
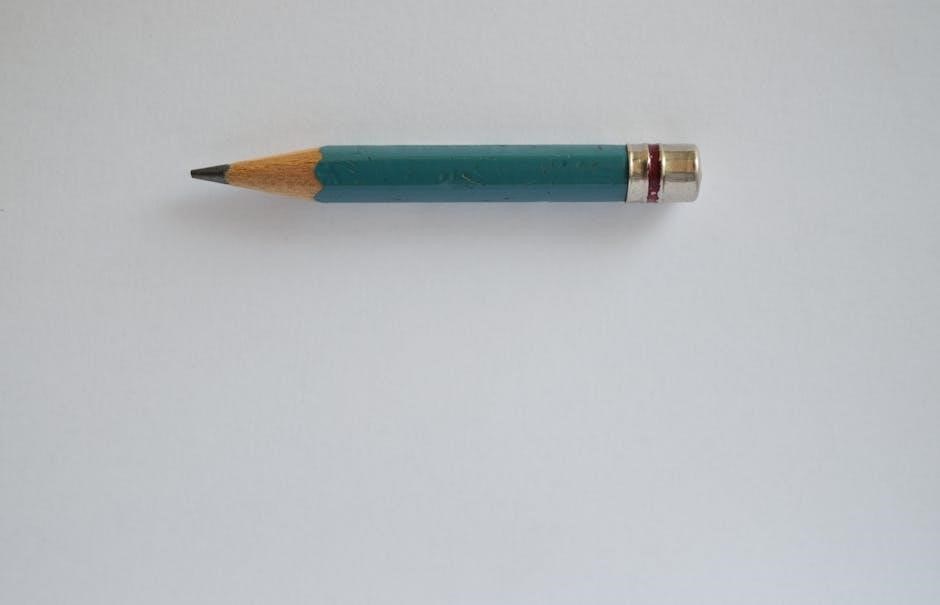
A simple technique involves using a straight edge‚ such as a pencil or ruler․ Position it vertically against the side of your nose; where it meets your brow indicates the ideal starting point․ To find the peak of your natural arch‚ angle the straight edge from the outside of your nostril‚ passing directly through the center of your iris․ Lastly‚ pivot the straight edge from the outside of your nostril to the outer corner of your eye; this marks where your brow should naturally conclude․
These three reference points provide the essential framework of your unique brow․ Adhering to these natural boundaries ensures that your grooming efforts merely enhance your facial features‚ rather than creating an artificial or overly sculpted look․ The aim is thoughtful refinement‚ preserving your inherent masculine aesthetic․
Identifying Your Brow Arch
Identifying your brow arch is a crucial step in achieving a well-groomed yet natural look․ For men‚ the arch should be subtle‚ avoiding overly dramatic curves that can appear unnatural or feminine․ To accurately find your natural arch‚ use a straight tool like a pencil or a thin ruler․ Hold it vertically against the side of your nose‚ then pivot it so it crosses directly through the center of your pupil while looking straight ahead․ The point where the pencil intersects your eyebrow directly above your pupil is typically the highest point of your natural arch․
This method helps you respect your face’s unique structure․ Understanding this peak allows you to trim and tidy around it without removing too much hair‚ which could lead to an undesirable appearance․ The goal is to define‚ not redesign‚ your inherent brow shape‚ ensuring a masculine aesthetic․ This thoughtful approach moves beyond simple ‘bare essentials’ grooming‚ aligning with today’s elevated style expectations for men․ It’s an important part of any comprehensive beauty routine‚ reflecting a refined sense of self-care․ Recognize that your arch might be slightly different on each brow‚ and strive for symmetry without over-correction․ This foundational step guides all subsequent grooming actions effectively․
Maintaining a Masculine Look
Maintaining a masculine look with your eyebrows is paramount‚ distinguishing effective grooming from an undesirable‚ overdone appearance․ Unlike women who might aim for bold‚ sculpted arches à la Cara Delevingne or the sleekness of Kim Kardashian‚ men’s brow grooming centers on refinement that respects natural ruggedness․ The objective is to enhance‚ not transform‚ your inherent features․ Avoid over-tweezing‚ which can result in overly thin or sharply defined brows‚ diminishing your masculine aesthetic․ Instead‚ focus on tidying stray hairs that disrupt the natural line and length‚ particularly beneath the main body and between the eyes․ This subtle approach ensures your eyebrows complement your face‚ providing a clean‚ confident frame without appearing overtly styled․ It’s about elevating your personal presentation beyond the ‘bare essentials’ without crossing into overtly feminine trends․ A well-groomed masculine brow retains its natural thickness and subtle structure‚ demonstrating thoughtful self-care and a modern understanding of style․ This quiet upgrade contributes significantly to a polished‚ confident demeanor‚ ensuring you look sharp and naturally refined․

Essential Eyebrow Grooming Tools for Guys
Elevating your grooming beyond the bare essentials requires specific tools․ For men’s eyebrows‚ precision trimmers‚ quality tweezers‚ and an indispensable spoolie brush are key to achieving a refined‚ masculine finish․
Precision Trimmers and Scissors
Precision trimmers and sharp‚ dedicated grooming scissors are foundational for men’s eyebrow care․ Moving beyond basic routines‚ these tools effectively manage unruly growth‚ maintaining a refined‚ masculine aesthetic․ Precision trimmers excel at reducing overall bulk and length‚ particularly where hairs grow thicker․ They offer controlled neatening‚ preventing over-grooming and preserving a natural look․ For individual stray hairs disrupting the natural brow line‚ small‚ fine-tipped scissors are indispensable․ Use them to snip only the very ends extending beyond your desired shape‚ avoiding deep cuts․ This preserves natural density and structure‚ preventing an overly sculpted appearance․ Quality tools ensure accuracy and safety‚ making your grooming routine efficient and precise․ They are essential for a polished appearance‚ elevating your overall style beyond minimal effort to a more considered‚ well-groomed presentation․
Quality Tweezers for Stray Hairs
Quality tweezers are indispensable for achieving a truly refined eyebrow look‚ moving beyond the bare essentials of men’s grooming․ While trimmers handle bulk‚ tweezers target those individual‚ rogue hairs that disrupt your natural brow line and can make your face appear unkempt․ Investing in a good pair with sharp‚ aligned tips is paramount; cheap alternatives often slip‚ break hairs‚ or cause unnecessary discomfort․ Precision is key for plucking stray hairs from below and between the brows‚ helping to define your arch without over-shaping․ This meticulous attention to detail contributes to a sleek and groomed appearance‚ an important part of any modern beauty routine․ Gently pull hairs in the direction of growth for minimal pain and effective removal․ Regular use of quality tweezers ensures a consistently tidy presentation‚ elevating your overall style and demonstrating a commitment to personal upkeep far beyond just rolling out of bed․ They are a small but mighty tool in your arsenal for a sharp‚ confident image․ This step is crucial for maintaining a masculine‚ yet polished‚ aesthetic․
The Indispensable Spoolie Brush
The spoolie brush‚ an often-underestimated tool‚ is truly indispensable in the modern man’s eyebrow grooming kit‚ moving well beyond the bare essentials․ Before attempting any trimming or tweezing‚ it is crucial to use a spoolie to brush your eyebrow hairs upwards and outwards․ This simple action reveals the true length and natural growth pattern of each hair‚ making it significantly easier to identify those unruly or excessively long strands that require attention․ Without this preparatory step‚ you risk an uneven trim or over-plucking‚ which can detract from a masculine look․ After trimming and tweezing‚ a final brush-through with the spoolie helps to blend the hairs seamlessly‚ ensuring a natural‚ yet sleek and groomed appearance․ This step is vital for avoiding a choppy or unnatural finish‚ contributing significantly to a polished overall look․ The spoolie also helps distribute any brow gel evenly for hold‚ making it an important part of any beauty routine focused on precise eyebrow maintenance․ It ensures your brows are always neat‚ contributing to a refined aesthetic․ Today‚ this tool is paramount for achieving that desired‚ well-kept brow․

Step-by-Step Eyebrow Trimming Techniques
Achieving a refined brow look involves systematic steps․ Mastering precise trimming methods is key for a polished aesthetic․ Move beyond basic grooming; these techniques ensure a sleek‚ masculine‚ and well-kept appearance‚ significantly enhancing your overall style․

How to Trim Long Eyebrow Hairs
For a well-groomed yet masculine appearance‚ tackling long eyebrow hairs is essential․ Begin by ensuring your eyebrows are clean and completely dry․ Using a clean spoolie brush‚ comb all your eyebrow hairs straight upwards‚ pushing them against your skin․ This action reveals any hairs that extend significantly beyond the natural upper edge of your brow line․ It’s crucial to identify these longer strands that disrupt your brow’s tidy silhouette‚ aligning with today’s elevated style expectations․

Next‚ take small‚ sharp grooming scissors‚ specifically designed for precision work․ With extreme caution‚ snip only the very tips of hairs protruding above your desired brow shape․ Aim to cut a tiny amount; remember‚ you can always trim more‚ but cannot put hair back․ Avoid cutting into the main body of your brow․ After trimming the top‚ brush hairs downwards and repeat for any stragglers below the natural bottom line․ Finally‚ brush eyebrows back into their natural position to check for evenness and a neat‚ refined finish‚ maintaining that effortlessly masculine aesthetic without appearing overly sculpted․
Mastering the Art of Tweezing

Mastering the art of tweezing is pivotal for achieving a clean‚ defined‚ yet masculine brow‚ moving beyond basic grooming․ Begin with a clean face and excellent‚ preferably natural‚ lighting to accurately identify every stray hair․ A warm washcloth can subtly open pores‚ making the process more comfortable; Always use sharp‚ high-quality tweezers․ When plucking‚ hold the skin taut with one hand and grasp the hair firmly at its base․ Pull swiftly in the direction of hair growth to minimize breakage and ingrown hairs‚ ensuring a smoother finish․ Focus on removing hairs clearly outside the main body of your eyebrow: strays underneath the brow‚ those in the unibrow area‚ and any isolated hairs above the main line․ The goal is to enhance your natural shape‚ not drastically alter it․ Step back frequently to assess progress and prevent over-plucking‚ which can result in sparse or unnatural-looking brows․ Remember‚ less is often more; aim for neatness and subtle definition‚ avoiding an overly sculpted appearance that doesn’t suit a masculine aesthetic․
Effectively Addressing the Unibrow
Effectively addressing the unibrow is a pivotal aspect of men’s grooming‚ ensuring a clean‚ polished‚ and distinctly masculine facial aesthetic․ The objective is to create a clear‚ natural separation between your eyebrows without appearing overly sculpted or unnatural․ The most effective and controlled method for this area is tweezing․ Begin by thoroughly cleaning the skin and using good lighting to clearly see all extraneous hairs․ Identify the hairs that bridge the gap between your brows‚ extending onto the nasal bridge․ Using sharp‚ quality tweezers‚ grip each hair firmly at its base and pull swiftly in the direction of growth to reduce discomfort and prevent ingrown hairs․ It’s crucial to establish a natural-looking gap; a good guideline is to align a pencil vertically from the outer edge of your nostril‚ marking where your brow should ideally begin․ Remove only the hairs that fall outside this line․ Avoid creating an overly wide or stark gap‚ which can look artificial․ Regular maintenance‚ perhaps every few days‚ will prevent significant regrowth and keep the area consistently neat․ This simple step profoundly enhances overall facial symmetry and elevates your grooming standards․

Advanced Grooming and Maintenance Tips

Elevate your look with advanced techniques․ Consider professional services for expert shaping and definition․ Use brow gels for hold and a polished finish․ A consistent routine prevents mistakes‚ ensuring a refined appearance․
When to Seek Professional Eyebrow Services
Knowing when to seek professional eyebrow services is a smart step in advanced grooming․ If you’re embarking on your eyebrow journey or find the initial shaping daunting‚ a professional stylist offers invaluable expertise․ They can expertly analyze your unique facial structure‚ natural brow shape‚ and growth patterns to craft a tailored look that perfectly enhances your features․ This initial‚ precise shaping provides an ideal baseline‚ making subsequent at-home maintenance significantly simpler and more effective․ Furthermore‚ for men with particularly thick‚ unruly‚ or asymmetrical brows that prove challenging for DIY methods‚ a professional’s precision tools and skilled hand can achieve remarkable results․ They adeptly address excessive hair‚ correct imbalances‚ and define an arch that ensures a masculine yet refined appearance․ Consider professional help for significant occasions‚ such as weddings or important business presentations‚ where a flawless‚ polished look is paramount․ Their trained eye will catch subtle details you might overlook‚ preventing common grooming errors and guaranteeing a consistently sharp finish․ Ultimately‚ professional services are an investment in achieving that sleek‚ well-groomed aesthetic‚ much like the standards admired in today’s style icons‚ ensuring you always present your best․
Using Brow Gels for Hold and Definition
Brow gels are an excellent‚ often overlooked tool for elevating your eyebrow game‚ moving beyond mere trimming to achieve a truly polished and defined look․ These products offer superior hold‚ keeping stray hairs neatly in place throughout the day‚ ensuring your brows maintain their desired shape․ For men‚ the key is to select a clear or subtly tinted gel that enhances natural texture without appearing overly done․ Application is straightforward: simply use the integrated spoolie brush to comb your brow hairs upwards and slightly outwards‚ following their natural growth pattern․ This technique not only tames unruly strands but also adds a subtle‚ healthy sheen and definition‚ making your brows look fuller and more intentional․ Brow gels are particularly effective for those with longer brow hairs that tend to fall out of place or for creating a more structured appearance after trimming․ They provide that final touch‚ preventing flyaways and maintaining a clean‚ masculine aesthetic․ Incorporating a brow gel into your routine is a simple yet impactful step‚ showcasing attention to detail and a commitment to a refined personal style‚ aligning with the evolving expectations for modern men’s grooming․ It’s a quick way to achieve a sharp‚ well-groomed finish that lasts․
Common Eyebrow Grooming Mistakes to Avoid
When men venture into eyebrow grooming‚ several common pitfalls can detract from a natural‚ masculine appearance․ One of the most frequent errors is over-plucking or over-trimming‚ which can result in brows that look too thin‚ sparse‚ or even feminine․ It’s crucial to remember the goal is to refine‚ not reshape entirely․ Another significant mistake is ignoring your natural brow shape․ Attempting to create an unnatural arch or drastically altering the brow line often leads to an artificial look that doesn’t complement your facial features․ Instead‚ work with what you have‚ simply cleaning up stray hairs and neatening the edges․ Neglecting the unibrow area entirely‚ while common‚ also creates an unkempt impression․ However‚ over-plucking the center can leave a wide‚ unnatural gap․ Focus on removing only the obvious connecting hairs․ Furthermore‚ using inappropriate tools‚ like a regular razor‚ can lead to uneven results or irritation․ Always opt for precision trimmers‚ quality tweezers‚ and a spoolie brush․ Finally‚ failing to establish a consistent routine means your efforts will be short-lived․ Regular‚ light maintenance is far better than infrequent‚ drastic overhauls․ Avoid these missteps for brows that enhance your overall style․

Establishing a Regular Grooming Routine
For lasting results and a consistently sharp appearance‚ establishing a regular eyebrow grooming routine is paramount for any guy․ Infrequent‚ drastic grooming sessions often lead to mistakes like over-plucking or an uneven finish․ Instead‚ aim for a consistent schedule‚ perhaps once every one to two weeks‚ depending on your hair growth rate․ This proactive approach ensures your brows remain neat without requiring extensive intervention each time․ Your routine should begin by cleansing your face‚ then brushing your eyebrow hairs upwards with a spoolie brush to reveal their natural length and identify any unruly strands․ Next‚ carefully trim any excessively long hairs that extend beyond the natural top line of your brow․ Following this‚ use quality tweezers to meticulously remove only the obvious stray hairs beneath and between your brows‚ taking care not to alter the main shape․ Conclude by brushing your brows into place․ A consistent routine prevents the buildup of unkempt hairs‚ making each session quicker and simpler‚ ultimately contributing to a refined and masculine look without appearing overly manicured․ This commitment to regular maintenance keeps your brows looking their best effortlessly․